Object type configuration#
Every object type in i-doit can be individually configured -- from the name and icon to the assigned categories. Here you will learn how to customize existing object types and which settings have which effects.
All standard object types in detail
A complete description of all predefined object types with usage examples and assigned categories can be found in the Object type reference. If you want to create your own object types, read Custom object types.
How to access the configuration#
Administration → Data structure → Object types → [Group] → [Object type]
Alternatively: Click the gear icon in the upper right corner of an object type's object list.

The following description follows the order of fields as they appear in the configuration screen.
Fields in the configuration#
ID#
The internal, sequential number of the object type. It is assigned by the system and cannot be changed. You can also find it in the URL when configuring the object type. Useful for API calls and SQL queries.
Translated name#
Shows you the current translation of the language constant in the selected language. Helpful to check whether your constant is correctly resolved -- especially when using custom language files.
Language constant / Name#
The name of the object type. You can either enter a plain-text name (e.g. Network Printer) or use a language constant (e.g. LC__OBJTYPE__NETWORK_PRINTER). Language constants are recommended if you operate i-doit in multiple languages -- the name is then automatically displayed in the language of the logged-in user.
SYSID prefix#
Determines the beginning of the SYSID for all objects of this type. If you leave this field empty, the default prefix SYSID is used and a Unix timestamp is appended. With a custom prefix (e.g. SRV-), the object ID is appended instead, resulting in more readable SYSIDs: SRV-42 instead of SYSID_1680000042.
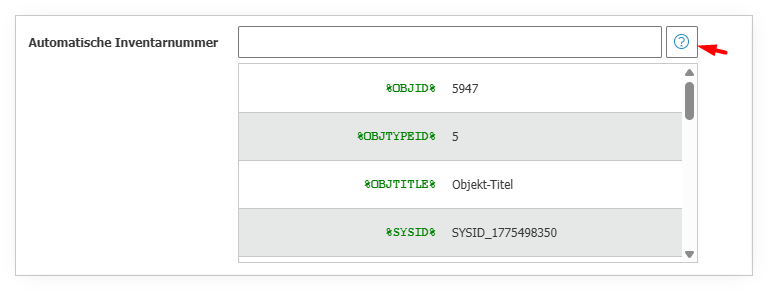
Automatic inventory number#
Defines a schema for automatically generated inventory numbers in the accounting category. Placeholders are available (click the blue question mark). Example: SRV-%COUNTER% produces SRV-001, SRV-002 etc. Can also be combined with the object title: %TITLE%-%COUNTER%.
Position in tree#
Controls the sorting within the object type group in the menu tree. Lower numbers appear higher up. If you do not assign a number, sorting is alphabetical. Useful for placing the most important object types (Server, Client, Switch) at the very top.
Object color#
Each object type can have its own color. This color appears in the CMDB Explorer and in the rack view. Helps with visual distinction -- e.g. servers blue, switches green, clients yellow.
Object type group#
Determines in which group the object type appears in the main menu: Software, Infrastructure, Other or Contacts. You can move object types between groups at any time -- the data is preserved, only the position in the menu changes.
Specific category#
Each object type can have at most one specific category. This category contains fields that are only meaningful for this object type -- e.g. the object type "Monitor" has the specific category "Monitor" with fields such as resolution and panel type. Specific categories are mutually exclusive.
Custom#
Indicates whether the object type belongs to the standard installation or was created by a user. default object types cannot be deleted, only hidden.
Location#
Determines whether objects of this type can serve as a physical location for other objects. Enable this option for buildings, rooms, racks and cabinets -- disable it for servers, clients and other end devices that are placed in a location but do not represent a location themselves.
Effect on the location browser
Only object types with the location option enabled appear in the location browser. If an object type is missing from the location browser, check this setting.
Relationship master#
Controls the direction of object relationships. Normally, the object you are editing is the "master" and the linked object is the "slave". If the linked object type is configured as relationship master, the direction is reversed. Relevant for the display in the CMDB Explorer and for service trees.
Positionable in rack#
When set to Yes, objects of this type can be positioned on rack units in the rack view. Prerequisite: The form factor category must be filled with the number of rack units. Disable this option for object types that do not belong in a rack (buildings, persons, software).
Display in menu tree#
When set to No, the object type is hidden in the main menu -- for all users. The objects still exist and are accessible via search or direct URL. Use this option to clean up unneeded standard object types without deleting them.
Image#
The default object image displayed in the information bar at the top (e.g. a server icon). Each object can receive an individual image via the Object image category, but here you set the default for the entire type.
Icon#
The small symbol next to the object type name in the menu tree. Specify the path relative to the i-doit installation directory. i-doit comes with a collection of icons -- you can find them under images/icons/silk/.
Object type constant#
The technical identifier of the object type, e.g. C__OBJTYPE__SERVER. This constant is used in the API, in SQL reports and in CSV import. i-doit automatically generates a constant with a Unix timestamp -- for better readability, replace the timestamp with a descriptive name in uppercase, e.g. C__OBJTYPE__NETWORK_PRINTER.
Do not change the constant retroactively
If external systems (API clients, CSV imports, JDisc profiles) use the constant, a change will cause errors. Set the constant carefully when creating the object type.
Default template#
Select a template that is automatically applied to new objects of this type. All fields from the template are pre-filled -- the user can override them if needed. Useful for pre-populating default values such as location, contact person or CMDB status.
Use object title from template#
When set to Yes, the object name is also taken from the template. Useful in combination with the automatic inventory number.
Overview page as default view#
When set to Yes, the overview page is displayed when opening an object -- a compact summary of the most important categories on one page. When set to No, the "General" category opens directly. For frequently used object types (Server, Client), the overview page is recommended.
Categories#
The most important setting: here you determine which categories are available for this object type. Activate the checkbox on the left to assign a category. The checkbox on the right determines whether the category appears on the overview page (only relevant if the overview page is enabled).
The order of categories in the left sidebar can be adjusted via drag & drop using the hatched bars.
Less is more
Deactivate categories that you do not need for this object type. A server does not need a "Printer" category, a room does not need a "CPU" category. Fewer assigned categories = cleaner sidebar = faster workflow.
Detailed information can be found under Assigning categories to object types.
Description#
Internal note field for the object type. Only displayed in the configuration, not in the regular user interface. Use it for notes to other administrators, e.g. "Do not delete -- needed for JDisc import".
JDisc default profile#
If JDisc import profiles are configured, you can set a default profile for this object type here. It is preselected in the "JDisc Discovery" category.