CSV Data Import#
Please create a complete backup before making any changes to an interface/import. If the result is not satisfactory, the backup can then be restored
A practical example for automated data import can be found on our Blog
With the CSV data import you transfer tabular data from Microsoft Excel, OpenOffice or LibreOffice Calc directly into i-doit. This way you replace unmanageable spreadsheets with a structured IT documentation.
Prerequisites#
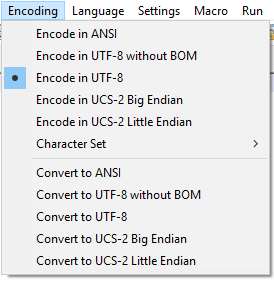
The CSV file must be in .csv format with UTF-8 encoding. If your spreadsheet application cannot set the encoding when saving, convert the file afterwards with a text editor. In the screenshot you can see the Convert to UTF-8 function in Notepad++:
The structure of a usable .csv file looks approximately like the following example:

The first row serves as a header and identifies the respective attribute. Each additional row corresponds to an object in the IT documentation.
Alternatively, you can also create CSV files with a text editor.

Once the .csv file is prepared, you can start the import.
Uploading the file#
The CSV data import can be found under Extras → Import → CSV Import. No prior configuration is necessary.
- Click Select file and upload your
.csvfile. - The file appears in the list. Hover over the row -- the actions Use for import, Download file, and Delete file are displayed.
- Click Use for import to proceed to the next step.

Setting options#
Before configuring the mapping, you first set some options.

Object type#
If you select a global object type under Global object type, i-doit imports all objects from the .csv file as this type.
Without a global object type, you need an additional column in the CSV file containing the database constant of the object type. This way you can import different object types (client, printer, monitor, etc.) in a single file. This specification must be present for all objects -- a mixed form is not possible.
Separator, headers, and default template#
If you use a different separator than the semicolon (;), specify it here. Without a header row, deactivate this option -- i-doit will then treat the first row as an object. Optionally, objects are created with the data from the default template.
Empty values#
When updating existing objects, you use Adopt empty values to determine how empty cells are handled:
- Yes: Empty cells overwrite existing attributes.
- No: Empty cells are ignored, existing attributes are preserved.
Handling list categories (multi-value)#
Specify how list categories (multi-value) are represented in the .csv file. If your import does not involve such categories, skip this section.
In the example above, "Client 02" appears multiple times: this client has two CPUs, so the list category CPU should receive two entries. You achieve this through an additional row -- you do not need to repeat unchanged attributes there.
Alternatively, you can store multi-value entries in a column or as a comma-separated list in a single cell.
For already existing category entries, additional options are available:
- Create new category entries only if the category currently has no entries (create new if empty)
- Create new category entries, existing ones are preserved (append)
- Create new category entries, existing entries are completely removed (replace)
Click Prepare mapping to proceed to the next step.
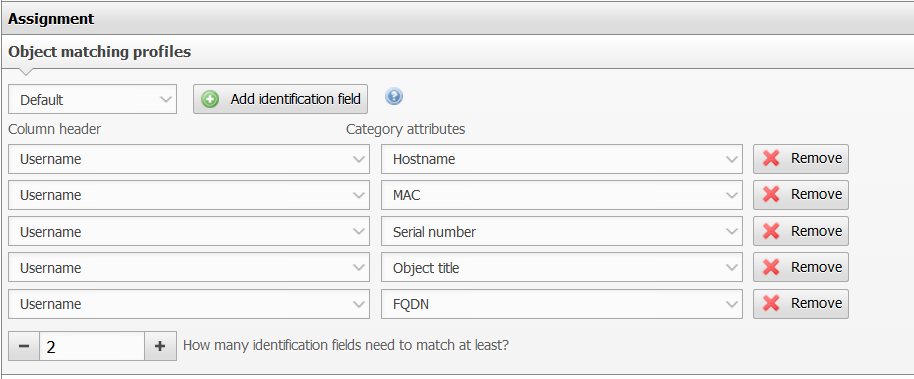
Setting identification criteria#
Select an object matching profile if you want to update existing objects. You can edit the profile at any time afterwards.
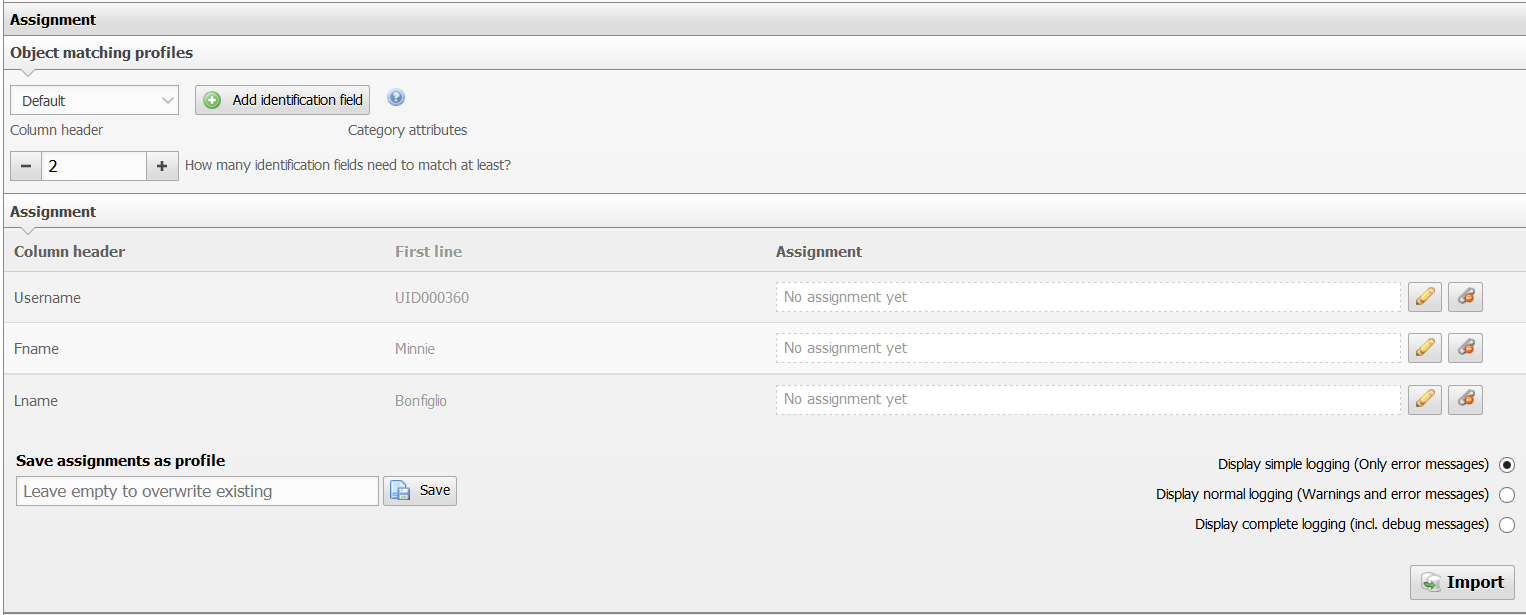
Assigning columns to attributes#
Each column of your CSV file receives its own row in the mapping. You link them step by step to i-doit attributes:
- Click the pencil icon next to a column.
- Select the matching attribute from the drop-down or type the name to get suggestions.
- Confirm with Apply.
Repeat the process for all relevant columns. Assignments can be removed afterwards. Columns without an assignment are ignored by the import.
Required fields#
Object title and object type are required fields:
- With a global object type, you only need to assign the object title.
- Without a global object type, a column must contain the object type as a database constant (e.g.
C__OBJTYPE__SERVER). The name (e.g. "Server") is not sufficient.
Creating a profile#
If you want to import CSV files with an identical column structure in the future, save the current mapping configuration as a profile. This saves you from repetitive assignments.
You can load or delete saved profiles via the options in the upper area. An existing profile can be overwritten without specifying a name.
Starting the data import#
Below the mapping, you set the level of detail for logging. Detailed logging helps with troubleshooting but increases duration and resource requirements.
Click Import to start the import. After completion, i-doit shows a summary with direct links to the imported or updated objects. You can adjust these manually at any time.

Overwriting object types during CSV import#
With the option Can the CSV import overwrite the object type? you change object types directly during the import.
This option can be found in the expert settings as import.csv.overwrite-objecttype.
This option is blocked by another option. If you activate overwriting of object types, you must set the option SYS-ID read only to No. In the expert settings, this option can be found as cmdb.registry.sysid_readonly.
Importing relationships (linking objects)#
You can also create relationships between objects via the CSV import. Place the object to be linked in a separate column and assign the corresponding attribute during mapping. An example for the physical location in column H:

During mapping you specify:
- Whether the object selection is unrestricted or limited to a specific object type.
- Whether objects that are not found should be automatically created. For this you specify the object type.
- Via which attribute the linked object is identified (special assignment). The default is the object title.
Note
The special assignment is not available for all fields. In that case, only the object title is used for identification of the object to be updated.

Importing values with units#
Some attributes consist of a value and a unit (e.g. Display in the Monitor category). In the web GUI you enter both separately; in the CSV import, value and unit must be in a single cell. Examples:
| Category | Attribute | Assignment during CSV data import | Cell in CSV file |
|---|---|---|---|
| CPU | CPU frequency | CPU frequency (unit) | 2.5 GHz |
| Local mass storage → device | Capacity | Capacity (unit) | 4 TB |
| Monitor | Display | Display (unit) | 24 Inch |
Further special cases#
| Category | Attribute | Assignment during CSV data import | Cell in CSV file |
|---|---|---|---|
| Operating system | Operating system > Variant (Variant) | DE (Language) |
Importing CSV files via the console#
In addition to the manual import via the web interface, you can also import CSV files with the i-doit console utility. This allows you to automate regular updates. The required profile IDs can be read with the command import-csvprofiles.