Installing the Forms add-on
1. Install Forms add-on#
Installing the license#
You can find out how i-doit is licensed in the article Licensing.
Download and installation of the Forms add-on#
A detailed descriptions regarding download, installation, updates etc. can be found in the article i-doit Add-ons.
2. Installation MongoDB#
The system requirements of MongoDB can be found here. In addition, MongoDB provides a checklist for use in operation.
We describe the use of Debian 12 as the operating system and the installation of MongoDB version 8
If you are using a different operating system, please use the MongoDB installation instructions https://www.mongodb.com/docs/manual/administration/install-community/
First install gnupg:
1 | |
We import the public key for the mongodb-org repository:
1 2 3 | |
Now we create a sources file for MongoDB:
This repo is to be used for Debian 12 only!
1 | |
Now we update the local package database:
1 | |
Now we can install the latest stable version of MongoDB:
1 | |
Next, we reload the services:
1 | |
So that MongoDB is started at the next system start:
1 | |
Now we start MongoDB:
1 | |
3. Installation NodeJS#
The installation was last tested with NodeJS v22.14.0 LTS, on Debian 12
Dependencies can be found here. A manual download as well as a installation guide can also be found there.
For the next step we need cURL:
1 | |
NodeJS is installed automatically via the package manager using the code displayed via https://nodejs.org/en/download:
1 2 3 4 5 6 7 8 9 10 11 12 13 14 15 | |
Now we can install NodeJS:
1 | |
4. Configuration of the Forms backend#
First, we navigate to the Form Backend subfolder within the i-doit installation:
1 | |
We create a copy of the configuration template:
1 | |
Using a text editor like, vi or nano, we now edit the .env:
1 | |
The FORMS_SECRET must not be empty. The key can consist of alphanumeric and special characters.
A FORMS_SECRET must be set and the file saved.
| Key | Value | Description |
|---|---|---|
| FORMS_SECRET | 'g87z$t2r346aSd6as%&f52458g724g875!' | Key for encrypting the data in the database. Must not be empty! Example: FORMS_SECRET='g87z$t2r346aSd6as%&f52458g724g875!' |
| FORMS_PORT | '3000' | Port for connections Example: FORMS_PORT='3000' |
| FORMS_MONGO_DB_SERVER | 'mongodb://127.0.0.1:27017/forms' | URL and port to connect to the MongoDB server Example: FORMS_MONGO_DB_SERVER='mongodb://127.0.0.1:27017/forms' |
Next, we create an instance. In order to use the run.sh, we must first set the rights for execution:
1 | |
Now we can run the run.sh:
1 | |
Each Forms instance has its own API and gets its own {Username} and {Apikey}. These can be defined freely and have nothing in common with the i-doit API. The data must be noted during the installation, because they must be entered later in the configuration of the Forms Add-on in the i-doit interface. Example: sudo ./run.sh instance:create forms1 abD5zfk74dsf4i55FOS32
To use forms-service.sh, we must first set the rights to execute it:
1 | |
We now have the systemd service created for the Forms backend. The Service will be activated and started:
1 | |
This completes the installation.
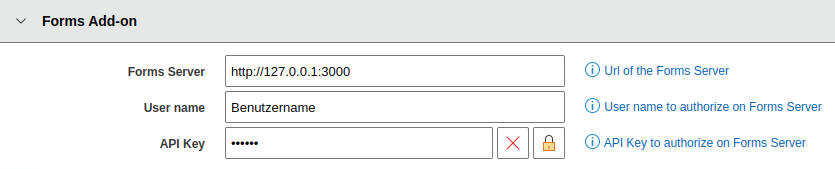
5. Configuration in i-doit#
In order for the frontend to be able to communicate with the backend, we have to store the previously used user name and the API key in the tenant settings. These are accessed via Administration → [Tenant name] management → Settings for [Tenant name] → Forms Add-on.