i-doit Virtual Eval Appliance#
i-doit GmbH provides a fully functional appliance of i-doit. It can be downloaded as a virtual machine.
This virtual appliance has the advantage that you can evaluate the functions of i-doit as quickly as possible. You need neither knowledge of the underlying LAMP stack, nor do you have to install the software; instead, you can start right away with a ready-made framework.
For Testing Purposes Only
The appliance is intended exclusively for testing purposes and should not be used as a production system.
Download#
The appliance is available for free download during the evaluation process. To request it with a valid test license, fill out the "On Premise Trial Version" form on the i-doit.com website.
Starting#
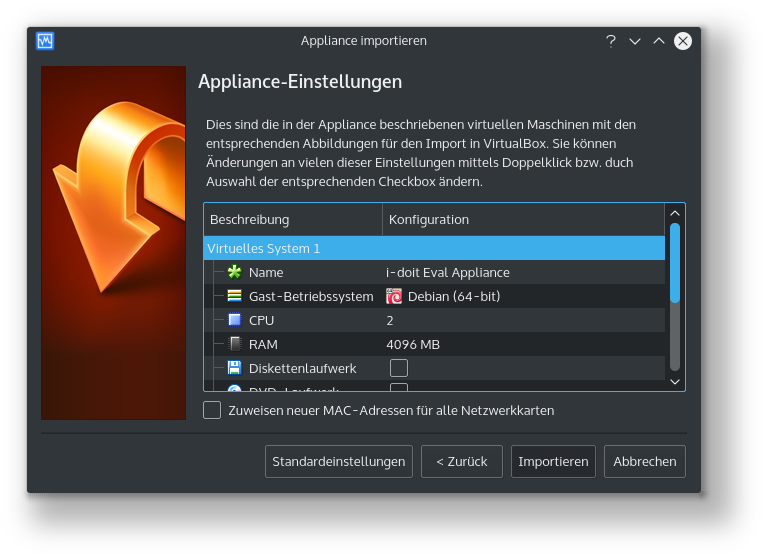
The download comes as a standard ZIP file that needs to be extracted after downloading. It contains an OVF file that can be imported into common virtualization environments.
During import, some settings may be requested (name, CPU cores, memory). The defaults can be accepted without issues. However, if they are changed, it is very likely that the settings of MariaDB and PHP will also need to be adjusted. It is also important not to fall below the system requirements.
Operating System
The installed operating system is Debian GNU/Linux 10 buster in the 64-bit variant. If the virtualizer does not automatically detect this, it should be specified manually. Otherwise, problems may occur when starting and running the VM.
Accessing i-doit#
On first startup, the VM attempts to obtain an IP address via DHCP and displays it on the console. When you open the IP address in the browser, the i-doit Web GUI loads.
The IP address can be configured via the console (see below).
Credentials#
| Tool | Username | Password |
|---|---|---|
| i-doit Web GUI | admin | admin |
| i-doit Web GUI | controller | controller |
| i-doit Admin-Center | admin | idoit |
| SSH | idoitadm | idoit |
| MySQL (i-doit) | idoit | idoit |
| MySQL (Systemuser) | root | idoit |
| Forms Add-on API | idoit | SrUBXhaop0bp4dgdtiMY |
Additionally, the predefined persons and person groups exist in i-doit.
Configuration#
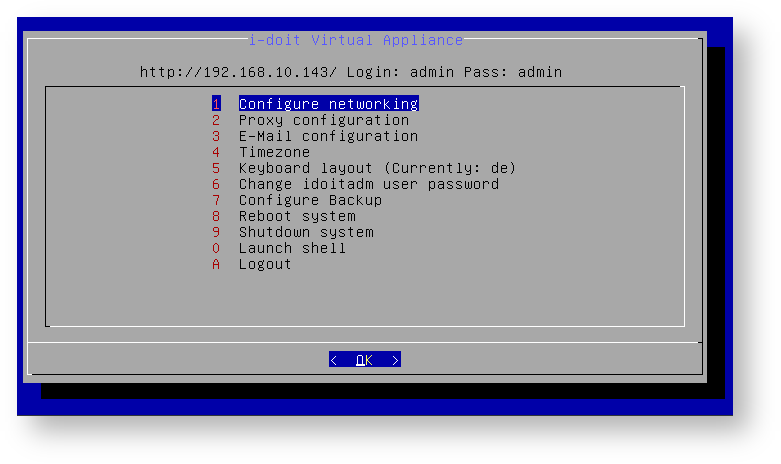
The appliance configuration can be done on the console. After logging in via SSH, a menu appears:
| Shortcut | Menu Item | Function |
|---|---|---|
| 1 | Configure networking | Set network connection; the network configuration is set to DHCP by default. |
| 2 | Proxy configuration | Specify HTTP proxy for the system |
| 3 | E-Mail configuration | E-mail settings |
| 4 | Timezone | Set time zone |
| 5 | Keyboard layout | Keyboard layout; de is set as default |
| 6 | Change idoitadm user password | Change the password of user idoitadm |
| 7 | i-doit scripting configuration | Change settings for CLI, cron jobs, backups and restore |
| 8 | Reboot system | Restart the system |
| 9 | Shutdown system | Shut down the system |
| 0 | Launch shell | Open shell for further actions |
| A | Logout | Log user idoitadm out of the system |
Scripts and Cron Jobs#
The appliance includes various scripts and cron jobs.
| Script | Purpose |
|---|---|
| idoit | i-doit CLI |
| idoit-backup | Run backup manually |
| idoit-restore | Run restore |
| idoit-jobs | Run cron jobs manually |
The scripts are located at /usr/local/bin/.
Pre-configured cron jobs exist at /etc/cron.d/i-doit that regularly optimize the system.
Every night, i-doit data is backed up locally. The retention period is one week.
Directories#
Where can things be found?
| Directory | Purpose |
|---|---|
| /var/www/html/ | i-doit installation directory |
| /etc/apache2/ | Apache web server configuration |
| /etc/php/8.x/ | PHP configuration |
| /etc/mysql/ | MariaDB configuration |
| /var/log/apache2/ | Apache web server logs |
| /var/backups/i-doit | Backups |
Post-Processing#
The appliance provides a "bare" installation of i-doit. This means neither demo data nor additional i-doit add-ons are included.
On first login, i-doit asks for a valid license that must be applied for all functions to be available.
Further first steps with i-doit are also described in the Knowledge Base under Basics.
Troubleshooting#
Connection refused
If the following error message is displayed when accessing i-doit:
1 | |
VM does not start
If the VM does not start, this is probably due to insufficient or incompatible settings in the virtualizer. Common virtualizers often provide helpful hints. For example, make sure to specify the correct operating system in the correct variant: Debian GNU/Linux 64-bit.
Unsupported hardware family
If the VMware environment in use is not up to date, the error message line 25 unsupported hardware family 'vmx-10'. To import anyway, the file i-doit Eval Appliance 1.2.x i-doit 1.x.x.ovf must be edited. In the line
1 | |
1 | |
1 | |
VSphere < 6.5.0
Our Virtual Appliance is encrypted with an SHA256 hash for security reasons. Unfortunately, vSphere only supports this from version 6.5.0 onwards. Here you can find the official VMware entry. It also describes how you can work with virtual machines that use an SHA256 hash on versions before vSphere 6.5.0.