Debian 12
In this article we explain in just a few steps which packages need to be installed and configured. We use a environment without desktop .
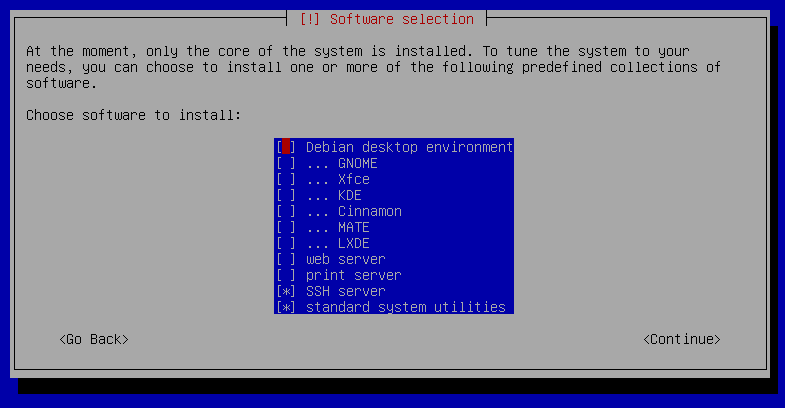
When you install Debian, you eventually reach a "Software selection" dialog which has a list of checkboxes to choose the software you want to install initially. This has a "Debian desktop environment" checkbox, pre-ticked; de-selecting that, and leaving all the other desktop environment checkboxes un-ticked (GNOME, Xfce, etc.), will result in a GUI-less installation:
System Requirements#
The general system requirements apply.
This article refers to Debian GNU/Linux 12 "bookworm". In order to find out which Debian version is used you can carry out the following command:
1 | |
As system architecture you should use a x86 in 64bit:
1 | |
x86_64 means 64bit, i386 or i686 only 32bit.
Installation of the Packages#
The default package repositories of Debian GNU/Linux already supply the necessary packages to install:
- the Apache web server 2.4
- the script language PHP 8.2
- the database management system MariaDB 10.11 and
- the caching server memcached
1 2 | |
Configuration#
The installed packages for Apache web server, PHP and MariaDB already supply configuration files. It is recommended to save changed settings in separate files instead of adjusting the already existing configuration files. Otherwise, any differences to the existing files would be pointed out or even overwritten during each package upgrade. The settings of the default configuration are supplemented or overwritten by user-defined settings.
PHP#
First of all, a new file is created and filled with the required settings:
1 | |
This file contains the following content specified by us. For more information about the parameters, have a look at PHP.net
1 2 3 4 5 6 7 8 9 10 11 12 13 14 15 16 17 18 19 20 21 22 23 | |
The memory_limit must be increased if necessary, e.g. for very large reports or extensive documents.
The value (in seconds) of session.gc_maxlifetime should be the same or greater than the Session Timeout in the system settings of i-doit.
The date.timezone parameter should be adjusted to the local time zone (see List of supported time zones).
Afterwards, the required PHP modules are activated and the Apache web server is restarted:
1 | |
Apache Webserver#
The default VHost is deactivated and a new one is created:
1 2 | |
This file contains the following content specified by us. For more information about the parameters, see httpd.apache.org
1 2 3 4 5 6 7 8 9 10 11 12 13 | |
i-doit includes differing Apache settings in files with the name .htaccess. The setting AllowOverride All is required so that these settings are taken into account.
With the next step you activate the new VHost and the necessary Apache module rewrite and the Apache web server is restarted:
1 2 3 | |
MariaDB#
To ensure that MariaDB delivers good performance and can be operated securely, you should not only follow our instructions, but also inform yourself further. Starting with a secure installation where the recommendations should be followed. In addition, the user root should be given a secure password.
1 | |
Activate the MariaDB shell so that i-doit is enabled to apply the root user during setup:
1 | |
If the MariaDB installation has already been carried out without setting the password, log in via mysql -u root and set a password via (1)
1 | |
- Für mehr Informationen zum Befehl schauen Sie hier -> https://mariadb.com/kb/en/alter-user/
The mode for shutting down InnoDB still needs to be changed. The value 0 causes a complete cleanup and a merge of the change buffers to be performed before MariaDB is shut down:
1 | |
A new file is created for the different configuration settings and our standard configuration is inserted:
1 | |
This file contains the new configuration settings. For optimal performance, these settings should be adapted to the (virtual) hardware. For optimal settings, please refer to mariadb.com
1 2 3 4 5 6 7 8 9 10 11 12 13 14 15 16 17 18 19 20 21 22 23 24 25 26 27 28 29 30 31 32 33 34 | |
Finally, MariaDB is restarted:
1 | |
[Warning] You need to use --log-bin to make --expire-logs-days or --binlog-expire-logs-seconds work.
If this message appears in the log, simply comment out expire_logs_days = 10 in the file /etc/mysql/mariadb.conf.d/50-server.cnf. Bug report for Debian -> https://salsa.debian.org/mariadb-team/mariadb-server/-/merge_requests/61
Next Step#
setup.md Now the operating system is prepared and i-doit can be installed.