User/Group Synchronization
Please create a complete backup before making any changes to an interface/import. If the result is not satisfactory, the backup can then be restored
This article shows you how to import users and groups from Active Directory into i-doit in a targeted manner. The import is always performed via the console.php command ldap-sync. At the end of this article you will find a complete example of an extended configuration.
Prerequisites:
- You have already set up the basic LDAP/AD configuration.
- You have basic knowledge in the area of AD/LDAP.
In the following examples, objectClass = user is used for persons and objectClass = group for groups. If you do not want to synchronize all users or groups of the domain, enter the DN/CN of an OU or container under Search for users in (OU).
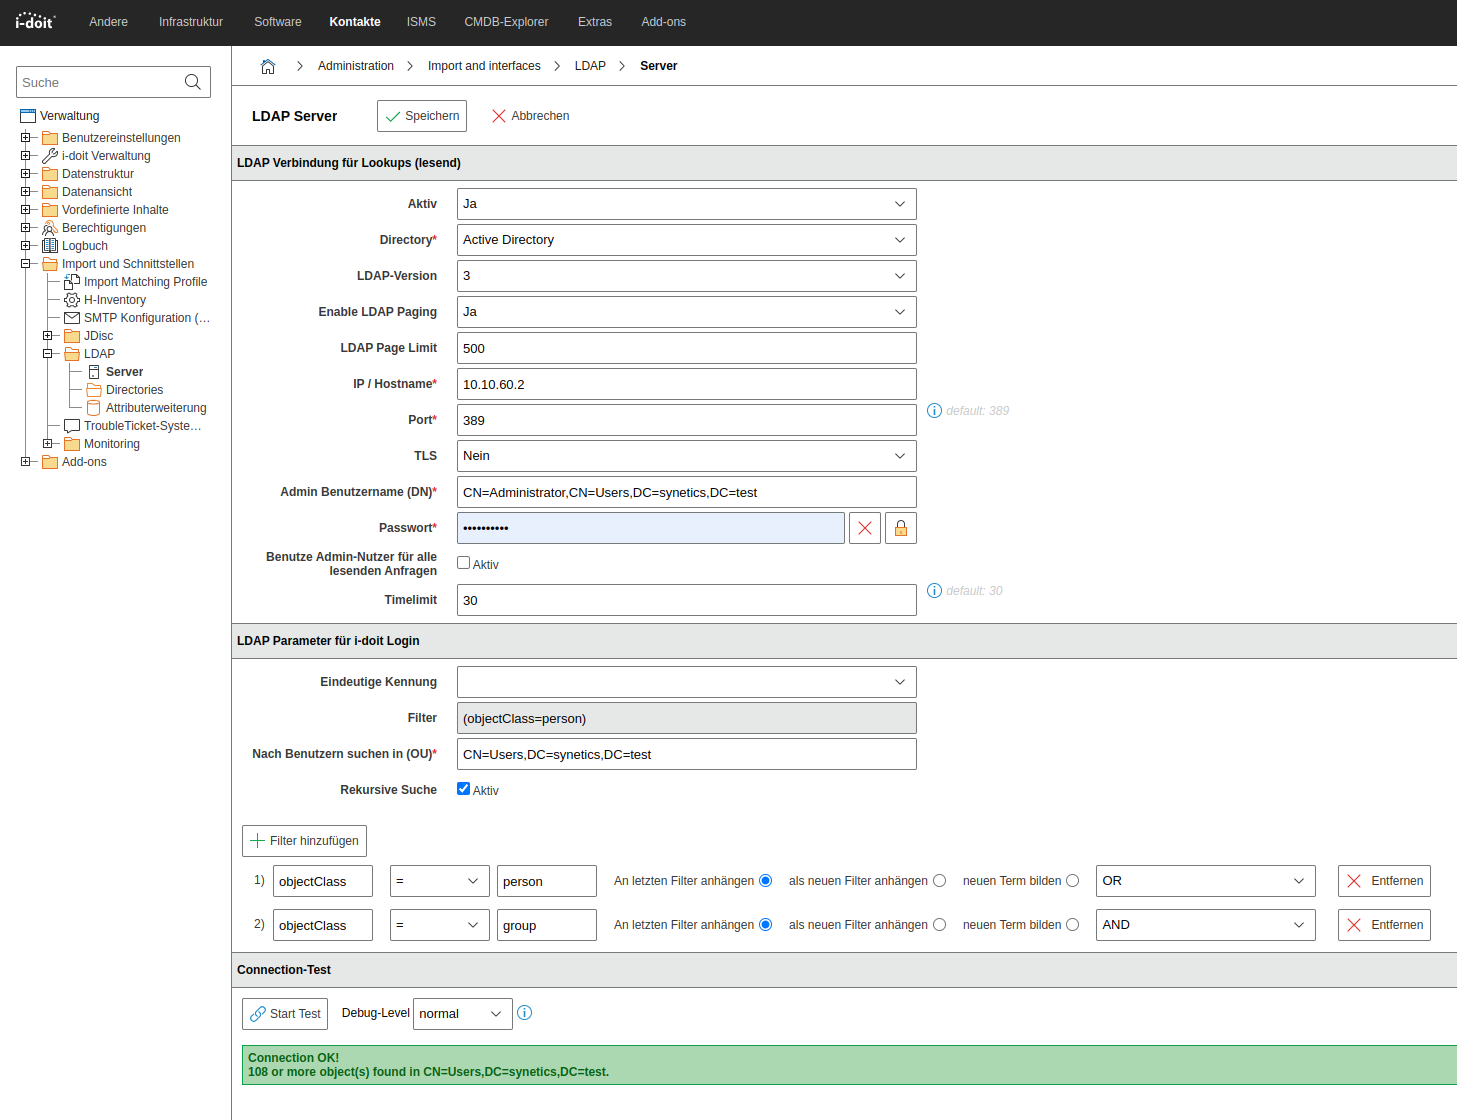
Configuring the filters#
Import of all users#
With this filter you synchronize exclusively users -- groups are not created in this process:

1 | |
Import of users with specific attributes#
You can filter for a specific attribute. In the following example, only the user whose sAMAccountName has the value MichaelO is synchronized:

1 | |
Import of all users and all groups#
This filter creates both users and groups and assigns the users to the respective groups:

1 | |
Import of users who are members of the group idoit-read#
With this filter you synchronize only users who are members of the group idoit-read:

1 | |
Import of users who are members of both idoit-read and idoit-write#
This filter synchronizes only users who are simultaneously members of the groups idoit-read and idoit-write:

1 | |
Import of users and groups that are below a nested group#
Assume you have a group idoit in which the groups idoit-read and idoit-write are members. With this filter, the subordinate groups and their users are automatically created.
The parent group idoit itself is not created in this process. Note that groups in i-doit cannot have other groups as members.

1 | |
How to filter users with more than one objectClass#
If users are distinguished by having two objectClass attributes (e.g. person and user), build the filter as follows:

1 | |
Which additional attributes can be imported via the ldap.ini#
Make sure you are familiar with the ldap.ini configuration and have already configured the attribute extensions. The following settings use the [additional] section of the .ini file.
Configuring the attribute extensions#
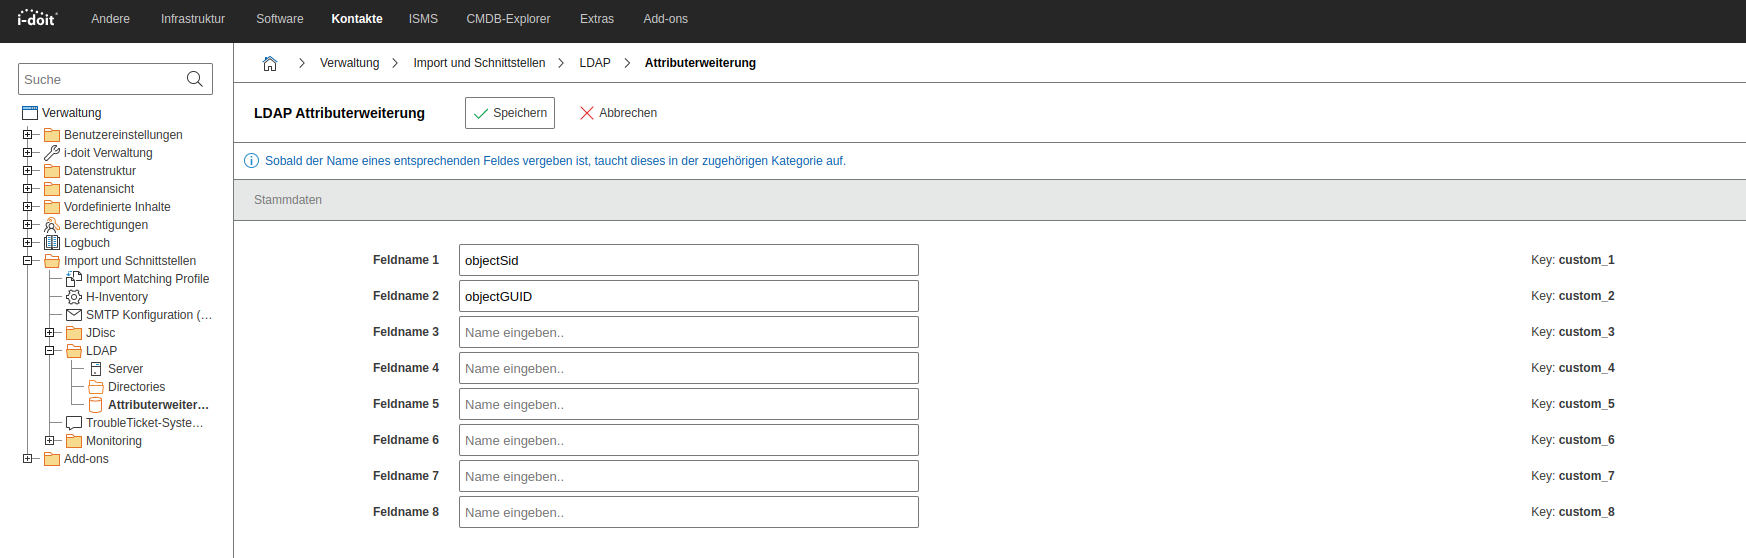
The configuration as a table:
| Field name | Attribute | Mapping with |
|---|---|---|
| Field name 1 | objectSid | Key: custom_1 |
| Field name 2 | objectGUID | Key: custom_2 |
| Field name 3 | - | Key: custom_3 |
| Field name 4 | - | Key: custom_4 |
| Field name 5 | - | Key: custom_5 |
| Field name 6 | - | Key: custom_6 |
| Field name 7 | - | Key: custom_7 |
| Field name 8 | - | Key: custom_8 |
Statically assign users to rooms#
In the ldap.ini you can enter fixed assignments of users to rooms. The users are then assigned to the respective room as a contact. The rooms must already exist in i-doit.
1 2 | |
Assign users as contacts to rooms#
It is possible to assign persons as contacts to rooms via the import_rooms function. To do so, the option must be set to true. Rooms are automatically created, however without a location.
1 2 3 | |
Setting the salutation#
To automatically set the salutation during import, configure the option attributes[salutation]= in the .ini file. In the following example, the AD attribute displayNamePrintable is used. You can also use other attributes, as long as they are present in the AD.
The value of the attribute displaynamePrintable could be e.g. "Herr", "Mr", "Mr." or "Frau", "Mrs.", "Mrs", "Ms.", "Ms", "Miss". These values can be configured in the Administration under [tenant-name] Administration > Settings for [tenant-name] > LDAP.
1 | |
This setting has been included in the example of the complete .ini file at the end of this article.
How to import attributes from LDAP#
If you have already configured the attribute extensions, you must next adjust the configuration file of the LDAP sync (ldap.ini).
The available attributes can be found in your AD configuration. An overview of which attributes belong to which field can be found e.g. at SelfADSI.
The following example shows a typical attribute mapping:
1 2 3 4 5 6 7 8 9 10 11 12 13 14 15 16 17 18 19 20 21 22 23 24 25 | |
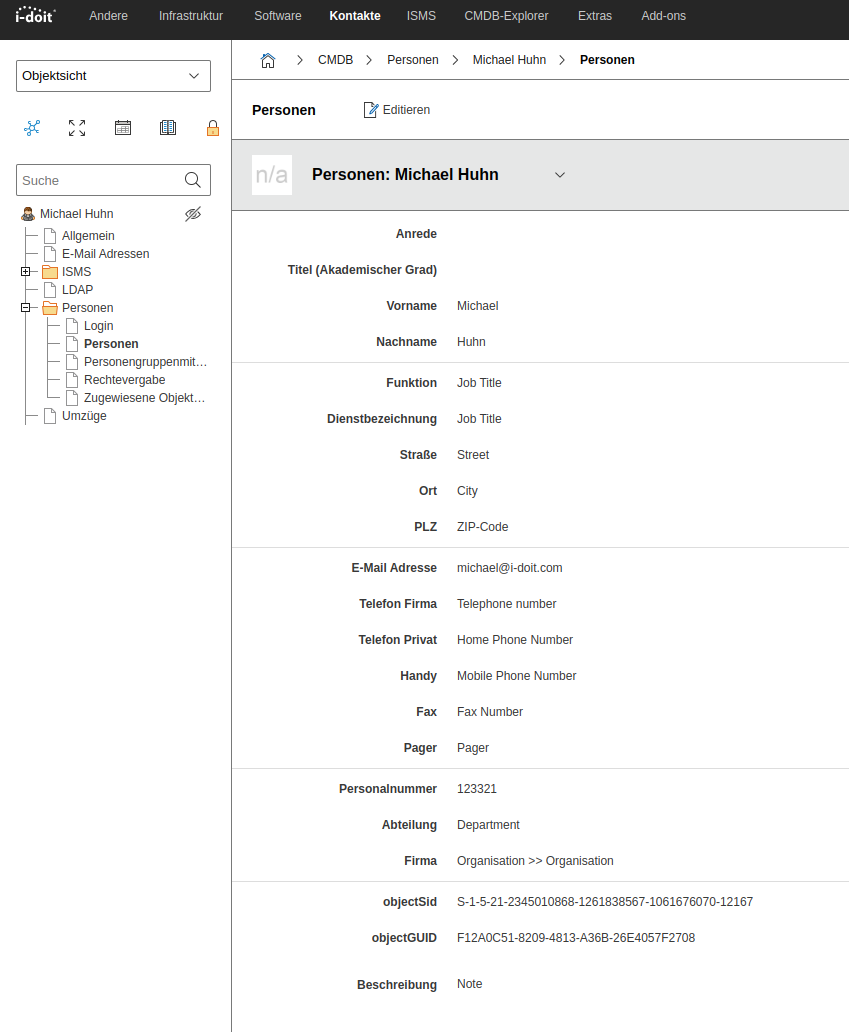
In this example, the master data attribute department is mapped to the LDAP attribute of the same name. Additionally, the attribute extension is used. The structure for e.g.
1 | |
works as follows:
attributes instructs the handler to synchronize the i-doit attribute [custom_1] with the LDAP attribute objectSid. After synchronization you will find the following master data:
Additional options#
autoReactivateUsers#
This setting automatically sets all users to "normal" status before synchronization. This is helpful if users have been accidentally archived or deleted.
Info
Be aware that with NDS or OpenLDAP it is currently not possible to identify deleted users in order to archive them later. Users are then always enabled!
1 | |
ignoreUsersWithAttributes#
With this option you prevent the synchronization of unwanted directory objects. A user is not synchronized when ignoreFunction fails for ALL selected attributes.
By default ignoreUsersWithAttributes=[] is set, so nothing is ignored.
In the following example, only users are imported whose attributes samaccountname, sn, givenname, and mail are not empty:
1 2 3 4 | |
ignoreFunction#
The check function for ignoring users (see ignoreUsersWithAttributes). This can be any function name callable via call_user_func or the following defined functions:
1 2 3 4 | |
Example: empty would be executed as empty($value)
To check for empty attributes:
1 | |
Synchronize empty attributes#
This option decides whether emptied attributes from AD should be synchronized with i-doit or not.
1 | |
The complete ldap.ini#
Here you will find a complete, customizable .ini file. The first part is based on the configuration file for console commands.
1 2 3 4 5 6 7 8 9 10 11 12 13 14 15 16 17 18 19 20 21 22 23 24 25 26 27 28 29 30 31 32 33 34 35 36 37 38 39 40 41 42 43 44 45 46 47 48 49 50 51 52 53 54 55 56 57 58 59 60 | |
For the .ini file to be used, it must be specified with the -c parameter.
1 | |