Google Authentication via OpenID#
Please create a complete backup before making any changes to an interface or import. If the result is not satisfactory, the backup can then be restored.
This guide shows you how to secure i-doit with Google OpenID Connect. Users then log in via their Google account.
Prerequisites#
- Apache web server with HTTPS/SSL enabled
- Debian 12 or compatible distribution
- Access to the Google Cloud Console
- Google account with an existing Cloud project
Step 1: Create an OAuth Client in the Google Cloud Console#
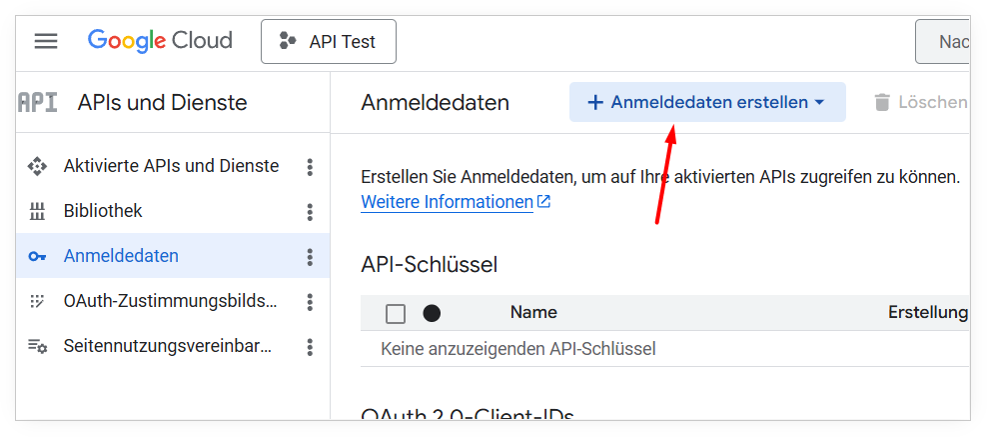
- Open the Google Cloud Console and select your project.
- In the left menu, navigate to APIs & Services → Credentials.
- Click + Create Credentials at the top.
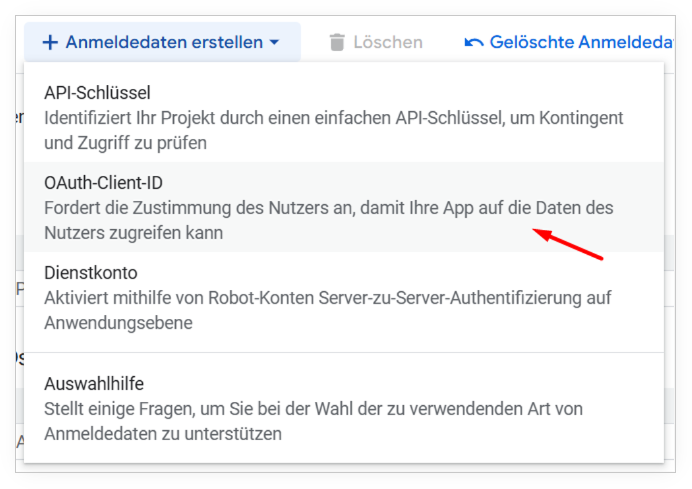
- Select OAuth Client ID from the dropdown
- Select Web application as the Application type.
- Enter a recognizable Name, e.g.
i-doit.
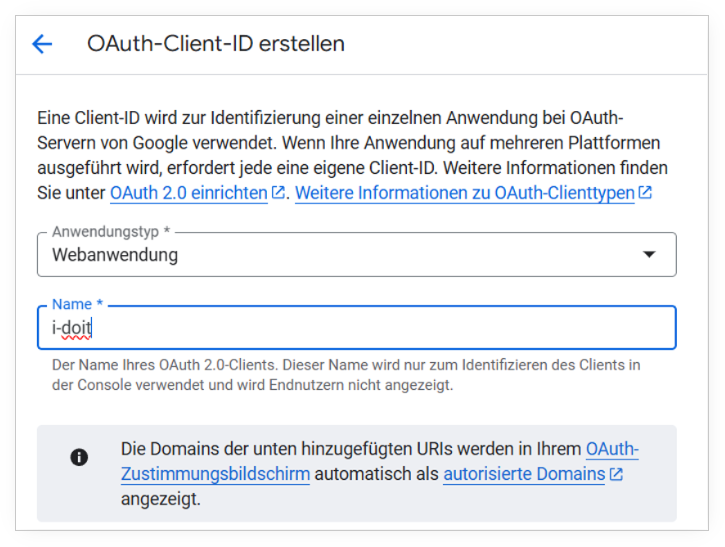
- Leave the Authorized JavaScript origins field empty.
-
Under Authorized redirect URIs, add the following URL:
1https://<YOUR-SERVER-URL>/redirect_uriThe path
/redirect_uridoes not need to exist as a file on the server — it only serves as the callback target for Google. 9. Click Create.
After creation, Google displays a dialog with the Client ID and Client Secret. Copy both values — you will need them for the Apache configuration. 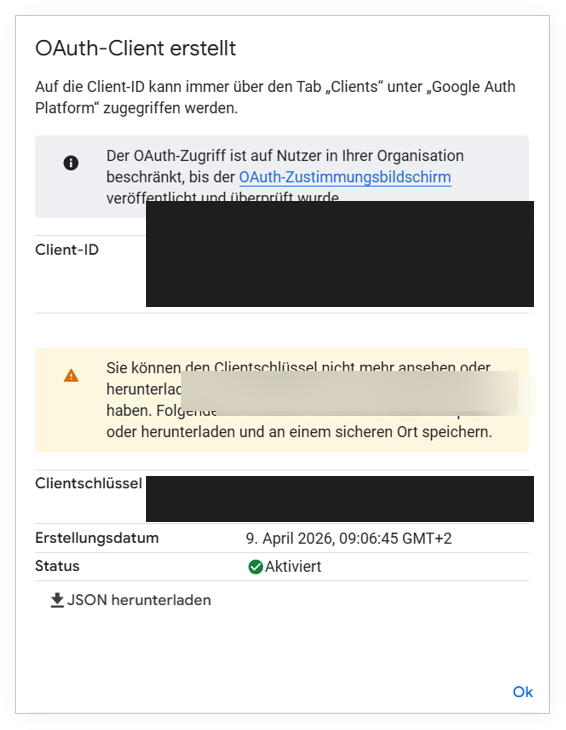
Client Secret is only shown once
The Client Secret is only fully displayed when this dialog is first opened. Save it immediately in a secure location.
OAuth Consent Screen
For production use, you also need to configure the OAuth consent screen (under APIs & Services → OAuth consent screen). This is not strictly required for an initial functional test.
Step 2: Install the Apache Module#
Install libapache2-mod-auth-openidc on the server running Apache:
1 | |
The module is activated automatically.
Step 3: Adjust Apache Configuration#
Open the SSL VirtualHost configuration (default: /etc/apache2/sites-available/default-ssl.conf) and add the OpenID Connect directives:
1 2 3 4 5 6 7 8 9 10 11 12 13 14 15 16 17 18 19 20 21 22 23 24 25 26 27 28 29 30 31 32 33 34 35 36 37 38 39 40 41 42 43 44 45 46 47 48 49 50 | |
Automatic Endpoint Discovery
Thanks to OIDCProviderMetadataURL, the module automatically discovers all necessary Google endpoints. Manual configuration of individual endpoints is not required.
Step 4: Restart Apache#
First, test the configuration for syntax errors:
1 | |
If Syntax OK appears, restart Apache:
1 | |
Step 5: Enable SSO in the i-doit Admin Center#
- Open the i-doit Admin Center at
https://<SERVER-URL>/admin/. - Log in with the Admin Center password.
- Click System settings in the top navigation.
- Scroll down to the Single Sign On section.
- Set Active to Yes.
- Select the desired tenant under Default tenant.
- Leave Use Domain Part set to No — i-doit will then use the full email address as the login name.
- Click Save.

Step 6: Prepare Users in i-doit#
The login name of the i-doit user must exactly match the Google account's email address.
- In i-doit, navigate to Administration → Rights management → Persons.
- Open the desired user.
- Set the Login name to the full Google email address, e.g.
user@example.com. - Save the user.
Login name must be an email address
When Use Domain Part = No is set, the full email address is expected as the login name, e.g. user@example.com.
Result#
The next time i-doit is accessed, the Google login screen appears automatically. After successful authentication with Google, the user is logged directly into i-doit — without a separate i-doit password entry.